FPGARM4ULinux Upload
From Fpga4u
Upload the software to the FPGARM4U card
Some images about the FPGARM4U
General view of the FPGARM4U.

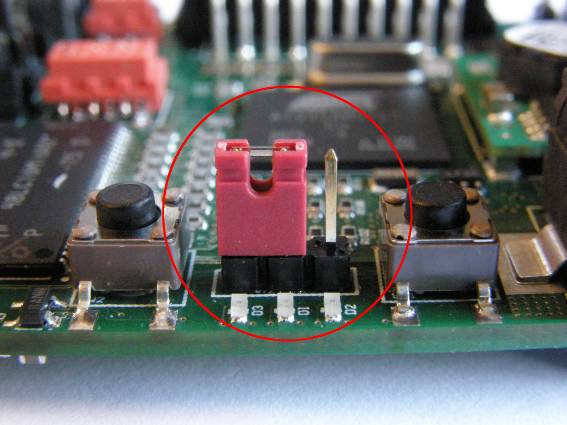
The flash jumper is used to connect the data flash. If the flash is activated, the card will automatically boot on it. To connect the flash, plug the jumper. Remove it to disconnect it.

The FPGARM4U supports two power supplies. The first (shown on this picture) is how to plug the jumper to use the USB power supply.
The second power supply is the sector power supply. This second picture displays how to plug the jumper to use the sector power supply.

General reset button.

Get the files from the development machine
Firstly, you have to decide whether you will use the autonomous way or the way using TFTP and NFS, download the script of your choice : autonomous, tftp nfs and uncompress it.
Then, download the files from /root/final (except the root file system) to the linux_autonomous directory or linux_tfpt_nfs directory (it depends on your first choice). For doing that, a SFTP/SSH program is required (FileZilla Client was used for this tutorial.
Program the board
Open a terminal with parameters :
- Serial line to connect to : COM1;
- Speed : 115200;
- Data bits : 8;
- Stop bits : 1;
- Parity : none;
- Flow control : none.
Either HyperTerminal or PuTTY (or anything else) can be used there, but PuTTY is recommended.
Connect the FPGARM4U card to the Windows computer with having avoided booting from the data flash. "RomBOOT", but nothing else, should appear on the terminal. To avoid booting from the data flash, follow this little guide:
- remove the data flash jumper to prevent the boot on the data flash;
- plug the USB wire; if a new driver needs to be installed, say YES for Atmel driver;
- reset the card with the reset button to oblige the card to boot on another device;
- add the jumper that you have removed in the point 1 to permit the access to the data flash;
- program the card using SAM-BA.
All the files (bootstrap, boot loader, boot loader environment, kernel) are loaded into the data flash for the autonomous way. Otherwise, the kernel is not loaded.
Upload from Windows
Upload manually
Open SAM-BA then
Init DataFlash
Tab : DataFlash
Scripts : Enable Dataflash on CS0 , Erase All
-> Execute
Init SDRAM
Tab : SDRAM
Script : Enable SDRAM 100 MHz
-> Execute
Bootstrap
Tab : DataFlash Script : Send boot file -> Execute (then choose bootstrap.bin)
The bootstrap will be put to the address 0x00000000.
Boot loader
Tab : DataFlash
File : bootloader.bin
Address : 0x00008000
-> Send file
Tab : DataFlash
File : tmp.bin
Address : 0x00004000
-> Send file
Kernel
Tab : DataFlash
File : uImage-2.6.24.7
Address : 0x00040000
-> Send file
Upload automatically
Autonomous
Go to the linux_autonomous directory.
In u_boot_variables configuration (in the tcl script), verify that :
- ethaddr is your MAC address : 00:60:D7:03:XX:XX (if you do not have any MAC address, let the field empty);
- bootargs has the option init=/bin/bash for the first boot, it should look like "bootargs=mem=64M console=ttyS0,115200 root=/dev/sda1 rw rootdelay=5 init=/bin/bash". If you are using the Pre made System, remove "init=/bin/bash".
Launch the at91sam9263ek_linux.bat script. And wait until the log file appears.
When it is done, unplug the card.
Remote server
Go to the linux_tftp_nfs directory.
In u_boot_variables configuration, verify that :
- ethaddr is your MAC address : 00:60:D7:03:XX:XX
- serverip is the IP address of your development machine : 128.178.74.XXX
- ipaddr is the IP address of your FPGARM4U card. Write a not used address
- bootargs is configured with the addresses above, replace SERVER_IP (serverip), IP_ADDR (ipaddr), GATEWAY_IP with the right values.
- bootargs has the option init=/bin/bash for the first boot.
Launch the at91sam9263ek_linux.bat script.
When it is done, unplug the card.
Upload from Linux
Atmel SAM-BA tools are for Windows only. Fortunately there is a Linux version.
From this page [1], download sam-ba_cdc_2.8.linux_01.zip, and follow the instructions to get the USB-serial port working. First of all, you need a kernel with these configuration options:
CONFIG_USB_SERIAL=m
CONFIG_USB_SERIAL_GENERIC=y
Then just follow the instructions on the website:
rmmod usbserial
modprobe usbserial vendor=0x03eb product=0x6124
It should work:
usb 3-1: new full speed USB device using uhci_hcd and address 63
usb 3-1: configuration #1 chosen from 1 choice
usbserial_generic 3-1:1.0: Generic device with no bulk out, not allowed.
usbserial_generic: probe of 3-1:1.0 failed with error -5
usbserial_generic 3-1:1.1: generic converter detected
usb 3-1: generic converter now attached to ttyUSB1
Then, install the tools:
unzip sam-ba_cdc_2.8.linux_01.zip
cd sam-ba_cdc_2.8.linux_01/sam-ba_cdc_2.8.linux_01
If you wish, you can follow the manual instructions by running sam-ba_cdc_2.8.linux_01, which launches a nice Windows-like GUI.
Otherwise the automatic instructions also work, of course the .bat won't work. But you can run this command instead, from the directory where you extracted linux_autonomous:
/path_to/sam-ba_cdc_2.8.linux_01 /dev/ttyUSB1 AT91SAM9263-EK at91sam9263ek_linux.tcl ./ bootloader.bin
(Modify path_to and /dev/ttyUSB1 as needed)