FPGARM4ULinux
From Fpga4u
Contents
FPGARM4U GNU/Linux
Author
Author : Yorick Brunet
Linux version : 2.6.24.7
Linux distribution : Debian Etch
Thanks to Nicolas Boichat for his tips on Linux.
Pre made system
Pre-requisites
Install the AT91 In-System Programmer of Atmel (tested with v1.12) and a tool for uncompress 7z files on your computer.
Have :
- USB A-B wire
- serial wire with adapter for DBGU
- USB key (2 GB or more)
- 1 jumper
- 1 FPGARM4U card
(- Ethernet RJ-45 wire)
Get and uncompress the loading script and either the image disk for GNU/Linux or Microsoft Windows :
- fpgarm4u_autonomous_complete.7z : loading script for autonomous way with bootstrap, boot loader and kernel
- fpgarm4u_pre_made_system.tar.bz2 : image disk, GNU/Linux version
- fpgarm4u_pre_made_system.7z : image disk, Microsoft Windows version
The account for the image disk is : root as username and fpgarm4u as password.
Operations
Load the image on the disk : GNU/Linux version
You need an administrator access on your computer.
- Identify the USB key (usually sdb if you do not have any other disk or USB peripherals). You can verify it with the following command.
# ls /dev/sd*
- Copy the image to the USB key.
# dd if=/path/of/the/image.img of=/dev/sdb
It is time to take a break. The copy takes about 15-20 minutes.
Alternative
If you don't have enough free space on your hard drive, you don't need to uncompress the bz2 beforehand; this command also works well:
tar xvf fpgarm4u_pre_made_system.tar.bz2 pre_made_system.img -O | dd of=/dev/sdb
Load the image on the disk : Microsoft Windows LAP version
- Uninstall LibUSB-Win32 if it is installed (Start -> All programs -> LibUSB-Win32 -> Uninstall LibUsb-Win32). This program prevent the VMWare Player from reaching the USB devices.
- Create the directory C:\fpgarm4u.
- Open a Windows Explorer and go to \\lapsrv1\distribution\Laboratoires\LaboFPGARM4U.
- Copy the virtual machine files fpgarm4u-debian and putty.exe in C:\fpgarm4u.
- Install the VMWare Player with VMWare-player-2.5.1.exe. It seems to work even though you do not restart the computer.
- Open VMWare Player and add the virtual machine from C:\fpgarm4u\fpgarm4u-debian (button Open). If the player asks you something for the allocated memory size or from where this virtual machine comes, answer "reduce" for the memory and "I copied it" for the virtual machine.
- When the system is started, log in with "root" as username and "fpgarm4u" as password.
- Stay in the virtual machine and plug the USB disk. It should be connected automatically. Otherwise, click on "Devices -> Feiya USB DISK -> Connect".
- Download the image disk.
# wget http://fpga4u.epfl.ch/images/FPGARM4U_distribution/fpgarm4u_pre_made_system.tar.bz2
- Uncompress it.
# tar xjf fpgarm4u_pre_made_system.tar.bz2
- Copy the image on the USB disk.
# dd if=pre_made_system.img of=/dev/sdb
It is time to take a break. The copy takes about 22 minutes.
Load the image on the disk : Microsoft Windows Everyone version
Run a command window and go where you uncompressed the image disk archive.
Get the list of the devices.
> dd.exe --list
You will receive a list which should look like the list below.
Win32 Available Volume Information
\\.\Volume{6ce3b4b3-c842-11dc-82da-806d6172696f}\
 link to \\?\Device\HarddiskVolume1
 fixed media
 Mounted on \\.\c:
\\.\Volume{46a42aae-111a-11dd-a209-806d6172696f}\
 link to \\?\Device\CdRom0
 CD-ROM
 Mounted on \\.\d:
\\.\Volume{a0f95d46-944d-11dd-a23b-005056c00008}\
 link to \\?\Device\Harddisk1\DP(1)0-0+18
 removeable media
 Mounted on \\.\f:
\\.\Volume{8b44946f-b646-11dd-a261-005056c00008}\
 link to \\?\Device\HarddiskVolume2
 fixed media
 Not mounted
Look for the letter of the USB disk that Windows gave to it. This looks like
Mounted on \\.\f:
and get the device link. You should have something like
\\?\Device\Harddisk1\DP(1)0-0+18
Throw away the end and keep the beginning
\\?\Device\Harddisk1
Now you have identified USB disk, you can send the image disk onto it.
> dd.exe if=pre_made_system.img of=\\?\Device\Harddisk1\Partition0
The hard disk number may change, adapt this guide to your environment.
It is time to take a break. The copy takes 2 hours.
Load the files on the card
Load the bootstrap, boot loader and Linux kernel of the FPGARM4U, follow this guide. You do not need to download the files indicate on the guide, use the script from fpgarm4u_autonomous_complete.7z.
Boot the card
- plug the USB key and the USB wire and wait while the system boots.
- Follow the guide at this page to configure your computer to be able to connect to your fpgarm4u card through the USB wire with SSH.
- When you are connected, verify that the clock is up to date with the command
# date
Otherwise, update it with
# ntpdate pool.ntp.org
That is it. The system should work.
Full installation
Pre-requisites
For installing GNU/Linux on a FPGARM4U card, you will need
- a computer with Microsoft Windows (tested with Windows XP), the Atmel's tools (AT91 In-System Programmer) and a program for archiving 7z and tar.bz2 format installed ;
- a computer or a virtual machine installed on the Microsoft Windows computer (tested with VMWare) were the GNU/Linux development (cross-compiling) system will be installed;
- a FPGARM4u card;
- a USB Key for the autonomous system (512MB is a minimum, 1GB is OK);
- an Internet access for the development system (wire or wireless) and, not necessary but recommended, for the FPGARM4U card (RJ-45 wire).
Machine set up
This section explains how to set up the Debian machine that will be used for the development of the software used by the FPGARM4U embedded system.
This machine will be used to compile
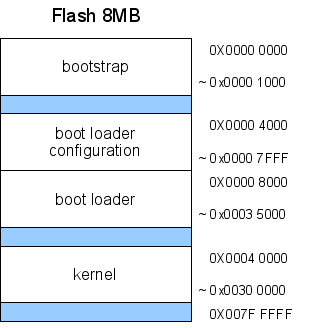
- the Bootstrap code
- the boot loader (Das U-Boot)
- the Linux kernel sources
- the Root File System
Developer Debian machine set up...
Time : 1 hour
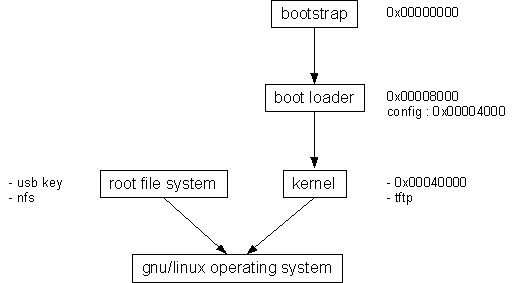
Files used to boot the FPGARM4U card
During the boot each file will be used for different events.
- Bootstrap : does the first configuration of really basic peripherals on the microcontroller, such as switching from the low speed clock to the high speed clock, loads the boot loader into the RAM and runs it.
- Boot loader : finds its configuration information (tmp.bin), configures some particular peripherals controllers on the ARM processor, (download and) load the kernel into the RAM and runs it.
- Kernel : continues the boot to have a working system.
Bootstrap development
This section describes how to configure and to compile it.
Time : 10 minutes
Boot loader development
The boot loader section describes how to configure and compile the "Das U-Boot" boot loader to run on the FPGARM4U board.
Time : 5 minutes
Linux kernel development
This section is intended to explain how to compile the Linux kernel to run it on the FPGARM4U board.
Time : 20 minutes
Root file system
This section explains how to get and prepare the basic GNU/Linux Debian file system.
Time : 20 minutes
Upload the software to the FPGARM4U card
This page show how to upload the generated files on the FPGARM4U board both automatically and manually.
Time : 5 minutes for the autonomous system
Boot
This section is the final one for having a basic GNU/Linux OS working on the FPGARM4U. The boot will be done in three parts
- install the archives from the RFS;
- finalise the installation by repairing and updating what there was done in the first part;
- work on the OS.
Time : 1 hour and 10 minutes